

One of the most important things that we as art teachers do, is showing our students how important art is in our lives. It's not just pretty pictures hanging on a wall! Sadly, that is what most of my middle school students thought as they entered my classroom.
Students need to be able to analyze art works in order to identify meaning and messages conveyed by the artists. In order to do this, the student needs to slow down and look carefully at the clues the artist has given us. Looking back in history, you can find many art works that you can observe and study with your students. Discuss with them some of the visual clues the artist used.
My favorite art work to use for this is Christina's World by Andrew Wyeth.
You can find a copy of Christina's World at: https://www.moma.org/collection/works/78455
I like to put this picture on my Smartboard and discuss different elements about the work.
Ask leading questions like:
Why is she sitting the way she is?
Is it a natural sitting position?
What is she looking at?
Think of the title. Christina's World? What is this saying about her world?
The paragraph below the picture on the website briefly
In addition to this activity with Christina's World, I also developed a series of handouts called OBC News (One Bright Crayon) in which I cover several historical art works and discuss how artists as far back cave men left us clues about themselves. I also included fun activities like a scavenger hunt and word unscrambles to keep the students focused and learning about artists.


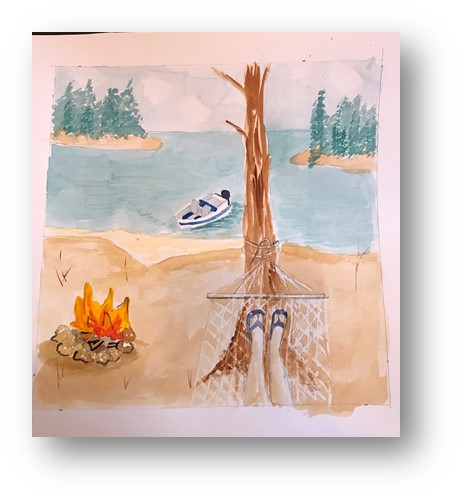
After these discussions, I have the students create an art work in which they become the story tellers. So, the students will plan, design and execute a watercolor painting with an eraser print border around it. Here is an example of the one I created as a sample to show the students. It was a favorite memory of mine from years ago when we camped on the lake. Relaxing in a hammock with the boat rocking back and forth in the waves was such a peaceful feeling for me after we were out for the summer!


Writing their story:
As we begin planning the watercolor painting, I provide the students with a sheet for them to begin writing their story in the traditional way. After brainstorming about various topics, students are ready to jump in and begin planning out the story. Once the story begins to form, the students will need to isolate what particular scene they want to show. For example, if it's a birthday party that their story is about, what moment in time do they want to show? The moment they blew out their candle? The moment everyone yelled SURPRISE? Once this is decided, then sketch out the story on Challenge 2 Handout or whatever you decide to use.

Learning to use watercolor paint:
Have the students sketch out a basic outline for their painting and set it aside.
If your students have little or no experience with watercolor paint then have them do some practice using the paint since it is very different than the paints they normally use. I developed a technique sheet that I have them test out their skills on BEFORE they begin painting their picture.
 Technique #1 - Wet on Wet - Wet the paper with clean water. Then quickly drop or spread some darker colors around and watch them blur because the wet paper keeps them from being absorbed quickly. Great for sky, water, backgrounds, etc!
Technique #2 - Dry on Dry - Use a moderately damp brush and pick up some paint that hasn't been watered down. Drag your brush across the paper. It should show your brush texture, If you see nothing different then dry your brush some more and try again. Great for tree bark, hair, etc!
Technique #3 - Lift with Tissue - Paint an area with paint that is barely diluted and then QUICKLY dab with a tissue or paper towel. It should pick up the paint leaving a light spot in the painted area, Great for sky!
Technique #4 - Resist With White Crayon - Write a message or draw something with a white crayon. Then paint over the area with a medium to dark watercolor paint. Ta-da! It stays white! Use this to leave areas of your painting white. (I used it for my hammock strings!)
I also let the students practice going from light to dark with various colors in the letters of the heading. Practice is a GREAT thing when using watercolor paint!
Beginning the painting:
When painting with watercolor, IT IS VERY IMPORTANT TO LET PAINT DRY BEFORE YOU TRY TO ADD DETAILS!!! Use a hairdryer if one is available.
Before painting, take your white crayon and color any areas that need to stay white.
I also added in a light wash of color for the faraway trees, water and sand.


Allow the painting to dry completely!
Then with less watered down paint, begin painting the details of the painting. Usually a much smaller brush is needed for this.
 Eraser Print Border:
Now it's time to challenge the students to think of a design that would tie in with their painting. For example: If the painting is a football game, then obviously a simple football would be make a great border. Outdoor scene? A simple leaf. Key word here is to keep it SIMPLE!
These 1" square erasers can be found at most art supply companies and work great for this project. I used my linoleum carving tools to cut out the design. You can draw directly on to the eraser with an ink pen and then gently carve out the lines.

 Once the eraser is carved, then it's a simple matter of coloring with a water based marker and stamping. Try several test prints before stamping directly onto the painting.
I also advise you to have the students measure and mark the 1" squares all the way around the border. This will help keep the stamp lined up around the painting.
Have fun with this lesson!
For more information about my lesson plan Click Here!
This lesson is very thorough! I love how you incorporated Writing in this lesson: "Write your Story".
ReplyDeleteThank you! Writing a story comes much easier to middle school students than painting a story! It helps them get their thoughts together!
ReplyDelete